SvelteKit Data Loading, Understanding the load function
During a workshop I was hosting at CityJS (3 years ago) for getting started with Svelte and SvelteKit, I received some valuable feedback from an attendee who was unclear about the role of the load function in SvelteKit.
This prompted me to revisit this topic and provide a more in-depth explanation for developers new to SvelteKit. In this post, I’ll focus on understanding the load function in SvelteKit and how it’s used.
So, to do that, first I’m going to need to explain routing and the file notation in SvelteKit. 😅
Routing in SvelteKit
In SvelteKit, the + file notation is used to indicate that a file is
part of a route. If I take a look at the src/routes directory in the
SvelteKit skeleton it looks like this:
└── +page.svelteSo, in the example above, running the dev server (pnpm run dev) and
visiting localhost:5173 will render the +page.svelte file.
pnpm create
svelte command.Each route can have one or many of the following files:
+page.svelte
+page.ts
+page.server.ts
+layout.svelte
+layout.ts
+layout.server.ts
+error.svelte
+server.ts
At a high level, here’s a summary of what each file does:
+page.svelte: represents a page, it is a standalone file that will be rendered when the corresponding route is accessed.+page.ts: a module that exports aloadfunction that fetches data for a page.+page.server.ts: exportsloadfunction that will be run on the server.+layout.svelte: a layout component that wraps multiple pages, allowing you to share components across pages.+layout.ts: a module that exports aloadfunction that fetches data for the layout component. This data is available to all child pages.+layout.server.ts: exportsloadfunction that will be run on the server.+error.svelte: a special page that is rendered when an error occurs during loading or rendering of a page.+server.ts: used to define custom API routes (endpoints) that handle HTTP requests.
I’ll dig into these more in the following sections.
This is a basic idea of what the file notation in SvelteKit is used for, I’ll also take a look at component props (short for properties) in SvelteKit.
Component props
In Svelte components, export let is used to declare a variable as a
prop, which allows it to receive data from a parent component.
In the following example, the name prop is declared and set to World by default.
<script lang="ts">
	export let name = 'World'
</script>

<p>Hello, {name}!</p>
In the parent, be that a Svelte component or a SvelteKit +page.svelte route, the name prop can be set to a different value.
<script lang="ts">
	import Greeting from './Greeting.svelte'
</script>

<Greeting name="Svelte" />
Why export let though?
I’ll refer to the MDN reference for export which states:
The export declaration is used to export values from a JavaScript module. Exported values can then be imported into other programs with the import declaration or dynamic import. The value of an imported binding is subject to change in the module that exports it — when a module updates the value of a binding that it exports, the update will be visible in its imported value.
In essence this ensures that when a component prop changes it will update the value of the prop in the parent component.
This also enables two-way binding, which is a feature of Svelte. More on that in the Data Binding in Svelte post I did a few years back.
Adding additional routes
If I wanted to add a route for /about, I’d need to create a
directory (or folder) with a +page.svelte file in that directory.
I can do this with a bash command like this:
mkdir src/routes/about
touch src/routes/about/+page.svelte
The folder structure would look like this now:
├── about/
│   └── +page.svelte
└── +page.svelte
In the src/routes/about/+page.svelte file, I can add some content to
render.
<h1>This is the about page</h1>Now, if I visit localhost:5173/about, I’ll see the +page.svelte for the about route.
Data loading
Now that I’ve detailed routing and component props in SvelteKit, I can
explain how the load function is used.
If I wanted to load some data for the about page, I could create a +page.ts file alongside the +page.svelte file in the /about folder.
touch src/routes/about/+page.tsNow there’s an associated +page.ts file for the +page.svelte file:
├── about/
│   ├── +page.svelte
│   └── +page.ts
└── +page.svelte
This is a contrived example, but say in that file, if I want to get
some data (from an external source later) I can use the SvelteKit load function that will return that data to be used in the +page.svelte file.
I’ll make a simplified example for now and just return an object with
a title property in the src/routes/about/+page.ts file:
export const load = () => {
	return {
		title: 'This data is from the load function',
	}
}
In SvelteKit, the +page.svelte file is a Svelte component, so it can
also receive props. The data prop is reserved in SvelteKit routes to
receive the data from a load function.
In the src/routes/about/+page.svelte file, I can receive the data prop and use it in the page.
I can just log out the data into a <pre> tag for now to see the
data:
<script lang="ts">
	export let data
</script>

<h1>This is the about page</h1>

<pre>{JSON.stringify(data, null, 2)}</pre>
Then I can use the data in the page and access the title property:
<script lang="ts">
	export let data
</script>

<h1>This is the about page</h1>

<p>{data.title}</p>
So, yes, a super simple example which I hope help illustrate how the load function works in SvelteKit.
Go deeper, practical examples
Ok, now onto some practical examples of using the load function.
So the most common use case for the load function is to fetch data
from an external source, like an API. I’ll be using two APIs in the
following examples, the Coinlore API (REST) and the Rick and Morty
API (GraphQL).
In the following sections I’ll go through various examples of fetching data from an API on the server and client.
Fetching page data, client
Ok, I’ll start with fetching the top 100 cryptocurrencies from the Coinlore API on the client.
I’ll use the index route for this, so I’ll add in a +page.ts file
for the index route:
touch src/routes/+page.tsMy /routes folder now looks like this:
├── about/
│   └── +page.svelte
├── +page.svelte
└── +page.ts
In the +page.ts file, I’ll create a load function, destructure the
SvelteKit fetch and create a response variable to store the data.
export const load = async ({ fetch }) => {
	const response = await fetch(
		'https://api.coinlore.com/api/tickers/',
	)
	const currencies = await response.json()
	return currencies
}
This example doesn’t have any error handling, I’ll add in some simple error handling:
export const load = async ({ fetch }) => {
	try {
		const response = await fetch(
			'https://api.coinlore.com/api/tickers/',
		)
		if (!response.ok) {
			throw new Error(`HTTP error: ${response.status}`)
		}
		const currencies = await response.json()
		return { currencies }
	} catch (error) {
		console.error(error)
		return { error: 'Unable to fetch currencies' }
	}
}
The return value of the load function is the data that will be
available in the +page.svelte file as the data prop.
In the +page.svelte file, I’ll receive the data prop and use it in
the page. I’ll just log out the data into a <pre> tag for now to see
the data:
<script lang="ts">
	export let data
</script>

<pre>{JSON.stringify(data, null, 2)}</pre>
That gives me an output similar to this on the page:
{
	"currencies": {
		"data": [
			{
				"id": "90",
				"symbol": "BTC",
				"name": "Bitcoin",
				"nameid": "bitcoin",
				"rank": 1
			}
		]
	}
}
Now I’ve validated the data is being fetched from the API, I can iterate over the data and render it on the page with a Svelte each.
<script lang="ts">
	export let data
</script>

<h1>Top 100 Cryptocurrencies</h1>

<ul>
	{#each data.currencies.data as coin}
		<li>{coin.name}</li>
	{/each}
</ul>
Now, say I have data from another API I want to fetch on the client. I’ll use the Rick and Morty API in the next example along with the Coinlore API.
Fetching page data from multiple sources
I’ll show an example of how I’d get the data from the Rick and Morty
API now, this is appending headers to the fetch function along with
a post method on the request and returning stringified JSON data.
export const load = async ({ fetch }) => {
	const query = `query AllCharacters {
    characters {
      results {
        name
        id
        image
      }
    }
  }`

	try {
		const response = await fetch(
			'https://rickandmortyapi.com/graphql/',
			{
				method: 'POST',
				headers: {
					'Content-Type': 'application/json',
				},
				body: JSON.stringify({ query }),
			},
		)

		if (!response.ok) {
			throw new Error(`HTTP error: ${response.status}`)
		}

		const { data } = await response.json()
		return { characters: data.characters.results }
	} catch (error) {
		console.error(error)
		return { error: 'Unable to fetch characters' }
	}
}
Notice that I’m returning characters from the data.characters.results results here, it cleans up the data returned
to the +page.svelte file.
Also note that I’m not using a client like graphql-request to make
the request, I’m using the fetch function from SvelteKit.
So, now I can combine the data from the Coinlore API and the Rick and Morty API.
export const load = async ({ fetch }) => {
const query = `query AllCharacters {
characters {
results {
name
id
image
}
}
}`
try {
const response = await fetch(
'https://rickandmortyapi.com/graphql/',
{
method: 'POST',
headers: {
'Content-Type': 'application/json',
},
body: JSON.stringify({ query }),
},
)
if (!response.ok) {
throw new Error(`HTTP error: ${response.status}`)
}
const { data } = await response.json()
const fetchCoins = async () => {
const response = await fetch(
'https://api.coinlore.com/api/tickers/',
)
const { data } = await response.json()
return data
}
const currencies = await fetchCoins()
return { characters: data.characters.results, currencies }
} catch (error) {
console.error(error)
return { error: 'Unable to fetch data' }
}
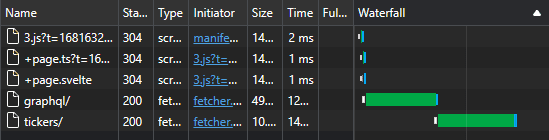
}There’s one issue with this approach, this is causing a waterfall where the Coinlore API request is only made after the Rick and Morty API request.
If I check the network tab in the browser I can see the calls are being made one after the other:
To avoid that I can wrap both the API calls in their own functions and the promise from each will be resolved at the same time:
export const load = async ({ fetch }) => {
	const query = `query AllCharacters {
    characters {
      results {
        name
        id
        image
      }
    }
  }`

	try {
		const fetchCharacters = async () => {
			const res = await fetch(
				'https://rickandmortyapi.com/graphql/',
				{
					method: 'POST',
					headers: {
						'Content-Type': 'application/json',
					},
					body: JSON.stringify({ query }),
				},
			)

			if (!res.ok) {
				throw new Error(`HTTP error: ${res.status}`)
			}

			const { data } = await res.json()
			return data.characters.results
		}

		const fetchCoins = async () => {
			const response = await fetch(
				'https://api.coinlore.com/api/tickers/',
			)

			if (!response.ok) {
				throw new Error(`HTTP error: ${response.status}`)
			}
			const { data } = await response.json()
			return data
		}

		return {
			characters: fetchCharacters(),
			currencies: fetchCoins(),
		}
	} catch (error) {
		console.error(error)
		return { error: 'Unable to fetch data' }
	}
}
Alternatively I can use a Promise.all to resolve both promises:
export const load = async ({ fetch }) => {
const query = `query AllCharacters {
characters {
results {
name
id
image
}
}
}`
try {
const [charactersResponse, currenciesResponse] =
await Promise.all([
fetch('https://rickandmortyapi.com/graphql/', {
method: 'POST',
headers: {
'Content-Type': 'application/json',
},
body: JSON.stringify({ query }),
}),
fetch('https://api.coinlore.com/api/tickers/'),
])
if (!charactersResponse.ok) {
throw new Error(`HTTP error: ${charactersResponse.status}`)
}
if (!currenciesResponse.ok) {
throw new Error(`HTTP error: ${currenciesResponse.status}`)
}
const charactersData = await charactersResponse.json()
const currenciesData = await currenciesResponse.json()
const characters = charactersData.data.characters.results
const currencies = currenciesData.data
return { characters, currencies }
} catch (error) {
console.error(error)
return { error: 'Unable to fetch data' }
}
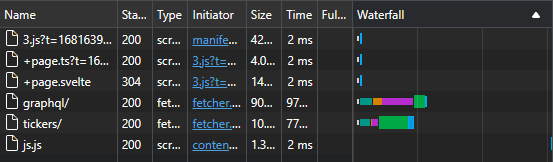
}Now if I take a look at the network tab in the browser, I can see that both requests are made in parallel:
Aight, now I’ll take a look at how to fetch data on the server.
Fetching page data, server
Neither of the APIs I’m using require authentication, so I can fetch data from them on the server.
The previous examples I’ve shown you are fetching data on the client and the server.
If I add a console log to the load function, I can see that it’s
being called on the server (I see the console log in the terminal) and
on the client (I see the console log in the browser).
If I have an API that requires authentication, I can fetch data on the server and pass it to the client.
I’ll need a +page.server.ts file, this indicates that the load function should only be called on the server.
touch src/routes/+page.server.tsAlthough this is a contrived example I’ll create a .env file to hold
some environment variables that can be used in the load function.
I’ll create the file via the terminal:
touch .env
echo "PUBLIC_TOKEN=this is a public token" >> .env
echo "SECRET_TOKEN=this is the secret token" >> .envPUBLIC_ will be
available via $env/static/public.I’ll replace the code in the +page.ts file with the following, which
will import the secret environment variable and log it to the console
then fetch the data from the Coinlore API.
I’ll add the same code to the +page.server.ts file:
import { SECRET_TOKEN } from '$env/static/private'

export const load = async () => {
	console.log('=====================')
	console.log(SECRET_TOKEN)
	console.log('=====================')
	const fetchCoins = async () => {
		const req = await fetch('https://api.coinlore.com/api/tickers/')
		const { data } = await req.json()
		return data
	}

	return {
		currenciesServer: fetchCoins(),
	}
}
If I try to run this code in the +page.ts file I’ll get an error
warning me that I can’t use $env/static/private in a client-side
file.
In the +page.ts file I’ll remove the $env/static/private reference
and re-label the return value to currenciesClient:
export const load = async () => {
	const fetchCoins = async () => {
		const req = await fetch('https://api.coinlore.com/api/tickers/')
		const { data } = await req.json()
		return data
	}

	return {
		currenciesClient: fetchCoins(),
	}
}
Now, running the dev server I can see that the secret token is logged to the console in the terminal but not in the browser.
But wait! Remember this is a contrived example, but, getting client side data and server side will be a common task.
I’m now getting the Coinlore data on the browser and the client, right?
In the +page.svelte file dump out the contents of the data prop
being passed to the page from the load function:
<script lang="ts">
	export let data
</script>

<pre>{JSON.stringify(data, null, 2)}</pre>
Going to the browser on localhost to check the JSON output I can see
that I have a currenciesClient property but not one for currenciesServer…
If I comment out the load function in the +page.ts file then I get
the currenciesServer property in the JSON output, but not the currenciesClient property.
If I have a load function in both a +page.ts and a +page.server.ts and I want that data to be available on the client
I’ll need to merge the two objects together.
In the +page.ts file I can pass in the +page.server.ts data prop
and merge it with the +page.ts data:
export const load = async ({ data }) => {
	const fetchCoins = async () => {
		const req = await fetch('https://api.coinlore.com/api/tickers/')
		const { data } = await req.json()
		return data
	}

	return {
		...data,
		currenciesClient: fetchCoins(),
	}
}
Going to the browser now to check the JSON output I can see that I
have a currenciesClient and currenciesServer in the output.
Fetching layout data, client
Ok, so, now I’m hoping you have a good understanding of how the + files work for fetching data.
For this example it’s the same setup as the previous example, but I’ll
create a +layout.ts file to fetch data on the client.
touch src/routes/+layout.tsI’ll delete the +page.server.ts file and rename the return from the +page.ts file back to currencies:
export const load = async () => {
	const fetchCoins = async () => {
		const req = await fetch('https://api.coinlore.com/api/tickers/')
		const { data } = await req.json()
		return data
	}

	return {
		currencies: fetchCoins(),
	}
}
Now, I have the following files in the src/routes directory:
src/routes
├── +layout.ts
├── +page.svelte
└── +page.ts
In the +layout.ts file I’ll add a load function to get all the
characters from the Rick and Morty API:
export const load = async ({ fetch }) => {
	const reqCharacters = await fetch(
		'https://rickandmortyapi.com/graphql/',
		{
			method: 'POST',
			headers: {
				'Content-Type': 'application/json',
			},
			body: JSON.stringify({
				query: `
          query AllCharacters {
            characters {
              results {
                name
                id
                image
              }
            }
          }
      `,
			}),
		},
	)
	const {
		data: {
			characters: { results },
		},
	} = await reqCharacters.json()

	return {
		characters: results,
	}
}
Data from layouts in SvelteKit is available to all child +page.svelte routes.
In the src/routes/+page.svelte file I’ll add a <pre> tag to dump
out the data prop:
<script lang="ts">
	export let data
</script>

<pre>{JSON.stringify(data, null, 2)}</pre>
In the index page I have access to the Coinlore data from the +page.ts and also the Rick and Morty data.
If I create another route, for example, /about, I’ll have access to
the characters data. I’ll validate that now by creating a new +page.svelte file in a src/routes/about directory:
mkdir src/routes/about
touch src/routes/about/+page.svelte
Then in the about route add a <pre> tag to the +page.svelte file
to dump out the data prop the same way I did for the index page:
<script lang="ts">
	export let data
</script>

<pre>{JSON.stringify(data, null, 2)}</pre>
In the about page I only have access to the characters data provided
by the +layout.ts file.
Fetching layout data, server
For fetching layout data on the server it’s the same exercise as with
the +page.server.ts file.
I’ll rename the +layout.ts file to +layout.server.ts.
mv src/routes/+layout.ts src/routes/+layout.server.tsAdd in a console log to the +layout.server.ts file much like in the +page.server.ts file, then I can see the console log in the terminal
but not on the browser console.
If I visit the /about page I can see the data is being passed to the src/routes/about/+page.svelte file.
Going back to the index page I get the Coinlore data along with the Rick and Morty data.
Conclusion
In this post I’ve covered the basics of SvelteKit, including routing,
component props, and the load function.
I’ve also covered how to fetch data from external sources on the client and server.
I hope this post has helped you get started understanding how to load data with SvelteKit.
Need expert guidance on implementing SvelteKit in your projects? Check out svelteconsulting.dev for professional consulting services and workshops on advanced SvelteKit patterns and best practices.
There's a reactions leaderboard you can check out too.
Sign up for the newsletter
Want to keep up to date with what I'm working on?
Join other developers and sign up for the newsletter.
I care about the protection of your data. Read the Privacy Policy for more info.