SvelteKit Page Reaction Component with Upstash Redis
I made a reactions component in SvelteKit that uses Upstash Redis to store the user reactions. It uses a SvelteKit form action to submit the reaction to the server. It’s a nice example of how to use Upstash with SvelteKit.
I’ll go through creating the project so you can follow along if you like or you can Tl;Dr and go to the example.
Create the Upstash Redis database
Upstash make it really straightforward to create a Redis database.
Go to https://console.upstash.com/login and create an account if you don’t have one already.
In the Redis databases section I’ll click on the ‘Create Database’
button. I’m then prompted to give the database a name, I’ll call it sveltekit-reactions.
For the type I can choose between ‘Global’ or ‘Regional’. I’ll go with the default ‘Global’ option.
The primary region I’ll go with where the project will be built which
will eventually be on Vercel so I’ll go with us-west-2. For the read
region I’ll go with us-west-1.
I’ll leave the rest of the options as the default and click the ‘Create’ button.
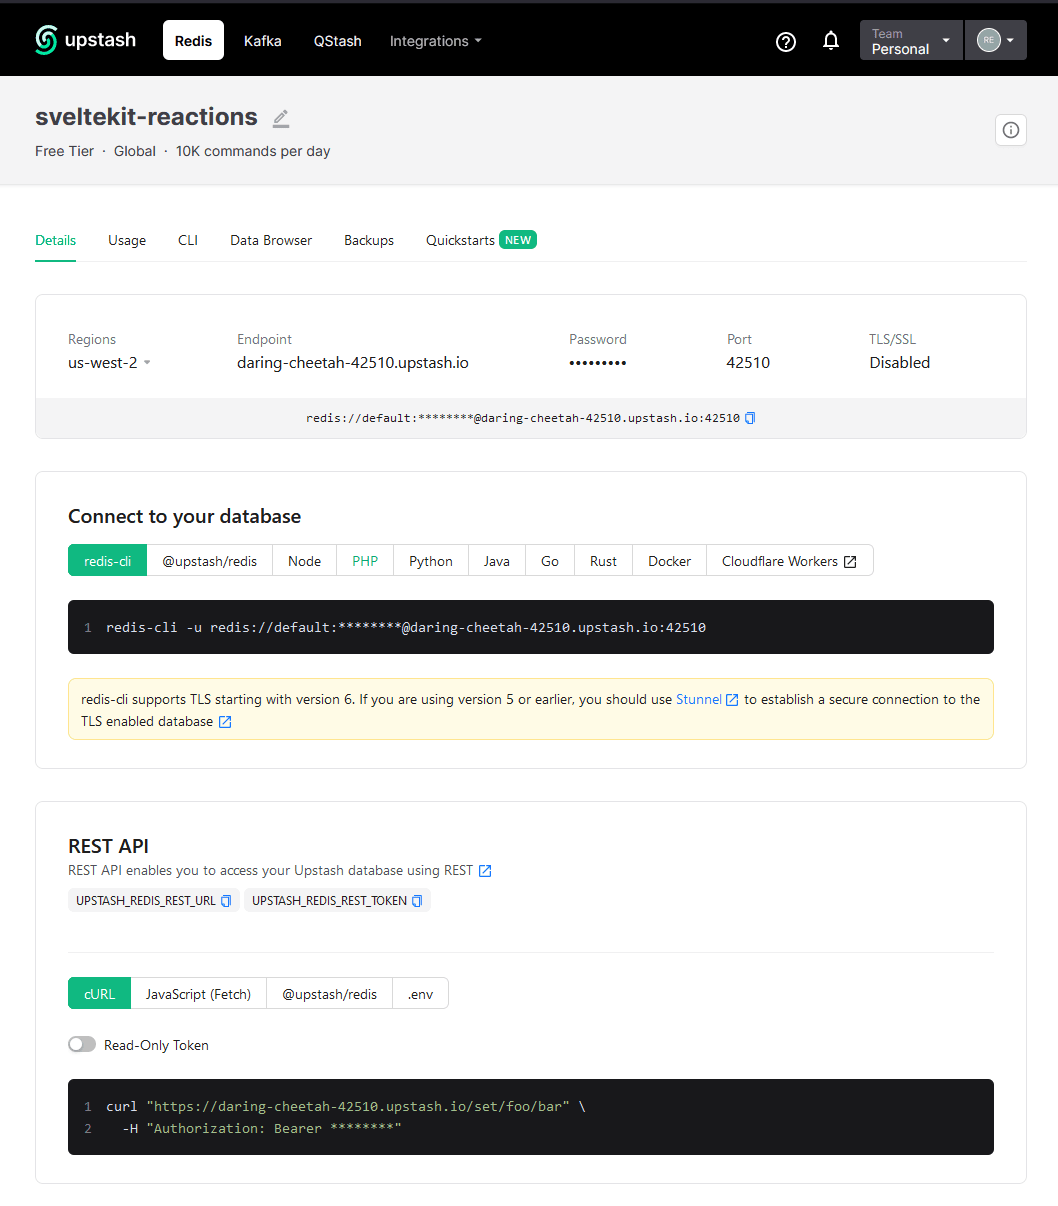
Take note of the ‘REST API’ section here, I’ll need the UPSTASH_REDIS_REST_URL and the UPSTASH_REDIS_REST_TOKEN to go
into the .env file in the project.
Which brings me to the next step.
Create the SvelteKit project
Aight! Now I can scaffold out the SvelteKit project. I’ll add in the
terminal commands if you’re following along, I’ll kick off the
SvelteKit CLI with the pnpm create command.
pnpm create svelte sveltekit-reactionsI’ll pick the following options:
create-svelte version 5.0.2

┌  Welcome to SvelteKit!
│
◆  Which Svelte app template?
│  Skeleton project
│
◆  Add type checking with TypeScript?
│  Yes, using TypeScript syntax
│
◆  Select additional options (use arrow keys/space bar)
│  ◼ Add ESLint for code linting
│  ◼ Add Prettier for code formatting
│  ◼ Add Playwright for browser testing
│  ◼ Add Vitest for unit testing
└
Then change directory into the project and install the dependencies I
need, right now I’ll install @upstash/redis and @upstash/ratelimit as dev dependencies.
cd sveltekit-reactions
pnpm i -D @upstash/redis @upstash/ratelimit
So I’m not messing around with styling I’ll install Tailwind CSS with
the daisyUI and Tailwind typography plugins with svelte-add.
npx svelte-add@latest tailwindcss --daisyui --typography
# install configured dependencies
pnpm i
Now a quick check to see if everything is working as expected.
pnpm run devSweet! So, now onto creating the form component with the reactions.
Create the reactions component
I’ll create the folders and files I need now for the project. First,
the reactions component which I’m going to put in the src/lib/components directory. The -p flag will create the parent
directory if it doesn’t exist.
Then create additional files for configuring the component, a utils file for re-useable functions and another file for the Upstash Redis client.
I’ll do that with the following commands.
# make the components lib directory
mkdir src/lib/components -p
# make the reactions component
touch src/lib/components/reactions.svelte
touch src/lib/{config,redis,utils}.ts
# add the page server file fo the form action
touch src/routes/+page.server.ts
The component will be a form that will submit the reaction to the server via a SvelteKit form action.
I’ll scaffold out the component first then move onto the form action.
Rather than have a predefined set of reactions I’ll make it so that
the user can add their own reactions in the src/lib/config.ts file.
I’ll also add in the config for the Upstash Ratelimit.slidingWindow here as well, ten requests inside a ten second window. (👈 more on
this later)
export const reactions = [
  { type: 'likes', emoji: '👍' },
  { type: 'hearts', emoji: '❤️' },
  { type: 'poops', emoji: '💩' },
  { type: 'parties', emoji: '🎉' },
]

export const limit_requests = 10
export const limit_window = '10 s'
Then in the src/lib/components/reactions.svelte file I’ll import the
reactions from the config file and use them in the component.
<script lang="ts">
  import { reactions } from '$lib/config'

  export let path: string | null = '/'
</script>

<div class="flex justify-center">
  <form
    method="POST"
    action="/?path={path}"
    class="grid grid-cols-2 gap-5 sm:flex"
  >
    {#each reactions as reaction}
      <button
        name="reaction"
        type="submit"
        value={reaction.type}
        class="btn btn-primary shadow-xl text-3xl font-bold"
      >
        <span>
          {reaction.emoji}
        </span>
      </button>
    {/each}
  </form>
</div>
I’ve added some Tailwind and daisyUI classes to the form for some basic styling.
So, for now I just want to render out the emoji reaction as I’ve not wired up the count from redis yet.
I have added a POST method to the form and a name and type attribute to the button. This will be used in the form action to get
the value of the button that was clicked.
I also added in the action attribute which points to where the
action is located, in my case I’m going to create the action in the src/routes/+page.server.ts file so I’ll use / for the route.
I’ll also add in a path prop which I’ll need to identify the page
that the reaction was submitted from, I’ll default it to the index / if there’s nothing passed. I can then pass the path to the form
action as a query parameter, so, on the server, I can get the path
(url.searchParams.get('path')) for use in identifying where the
reaction came from.
So I can see what’s going on with the component as I build it out I’ll stick the component on the index page.
<script lang="ts">
  import Reactions from '$lib/components/reactions.svelte'
</script>

<h1>Welcome to SvelteKit</h1>
<p>
  Visit <a href="https://kit.svelte.dev">kit.svelte.dev</a> to read the
  documentation
</p>

<Reactions />
If I click one of the buttons now I get a 405 error telling me that
a POST method is not allowed as there are no actions for the page.
I’ll create the form action next.
Create the form action
Now I want to get the form action working so I can get the value of the button that was clicked and send it to the server.
In the src/routes/+page.server.ts file I’ll add in an actions
object, in this case I’m going to need only the default action.
In the default action I’ll need the form data which I can get out of
the event.request which will be name and value of the button
that was clicked. I can then get the reaction out of the data object.
The last thing I’ll need is the path which will be the page the
component is on. In the previous section I added a path prop to the
component currently it’s defaulting to /.
For now I want to validate the action is working so I’ll just log out the data to the console.
export const actions = {
  default: async ({ request, url }) => {
    const data = await request.formData()
    const reaction = data.get('reaction')
    const path = url.searchParams.get('path')

    console.log('=====================')
    console.log(data)
    console.log(reaction)
    console.log(path)
    console.log('=====================')
    return {}
  },
}

export const load = async () => {
  return {}
}
I’ll return and empty object for the default action and the load function for now.
Clicking on one of the buttons now I can see the data in the terminal where the dev server is running.
=====================
FormData { [Symbol(state)]: [ { name: 'reaction', value: 'likes' } ] }
likes
/
=====================
Cool, so I now have the base of what I want to store in Redis.
Add the Redis client
Now I’ll set up the redis client, I’ll first need to create a .env file to add the Upstash API keys to. I’ll create the .env file in
the root of the project from the terminal.
touch .envThen get the REST API keys from my Upstash dashboard, I’ll scroll to
the REST API section, select the .env option then use the handy copy
option and paste them into the .env file.
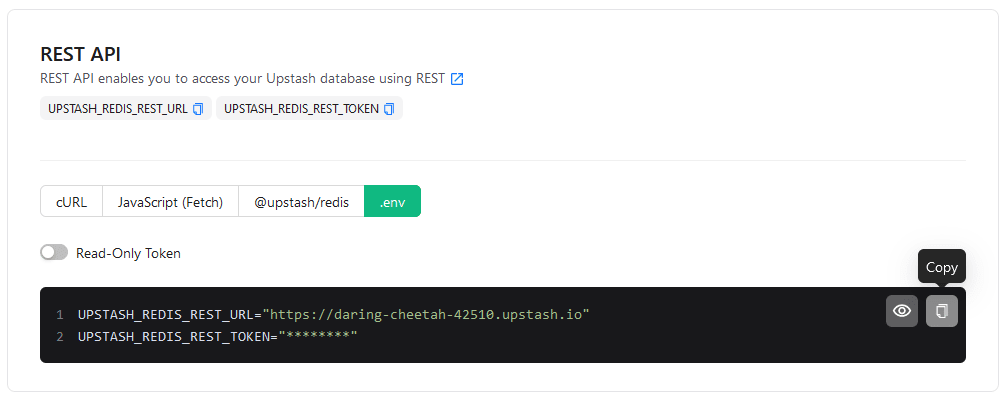
Now I can import the keys into the src/lib/redis.ts file and create
the Redis client and initialise Upstash Ratelimit. I’ll also add in
the config for the Upstash Ratelimit.slidingWindow here as well.
import { building } from '$app/environment'
import {
  UPSTASH_REDIS_REST_TOKEN,
  UPSTASH_REDIS_REST_URL,
} from '$env/static/private'
import { Ratelimit } from '@upstash/ratelimit'
import { Redis } from '@upstash/redis'
import { limit_requests, limit_window } from './config'

let redis: Redis
let ratelimit: Ratelimit

if (!building) {
  redis = new Redis({
    url: UPSTASH_REDIS_REST_URL,
    token: UPSTASH_REDIS_REST_TOKEN,
  })

  ratelimit = new Ratelimit({
    redis,
    limiter: Ratelimit.slidingWindow(limit_requests, limit_window),
  })
}

export { ratelimit, redis }
I’m checking if the app is building and if it’s not I’ll create the
Redis client and initialise Upstash Ratelimit and export these for use
in the src/routes/+page.server.ts file.
Add reactions to Redis
Now I can check the connection is working and start adding the reactions to the Upstash Redis database on button click.
I won’t go into the specifics of Redis here as there are plenty of resources out there for that. Essentially it’s a key value pair, the key in this case being the reaction and the page it was clicked on.
I want to know the page the reaction was clicked on so that’s why I’m
passing in the path to the form action. So when I create the key I
can use the path and the reaction to create a unique key.
If I use the component on the about page and someone clicks the like
button the key in the Redis database will be about:likes. I’m then
using the incr method to increment the value of the key by one.
import { redis } from '$lib/redis.js'

export const actions = {
  default: async ({ request, url }) => {
    const data = await request.formData()
    const reaction = data.get('reaction')
    const path = url.searchParams.get('path')

    const redis_key = `${path}:${reaction}`

    const result = await redis.incr(redis_key)

    return {
      success: true,
      status: 200,
      reaction: reaction,
      path: path,
      count: result,
    }
  },
}

export const load = async () => {
  return {}
}
Once the key is created and the value is incremented I can return the
data to the client. I’ll return the reaction, path and the count which is the value of the key.
I can now receive the data as a prop to the component.
Get Redis data into component
Ok, in my component/form I can now accept a data prop which will
have the reaction, path and count from the server in it. But the
data from the server isn’t going back to the component it’s going back
to where the component is being used.
So, in my index page I’ll need to accept the data prop coming back
from the server (form action) which I can then pass to the component.
On the index page I’ll accept the data prop to the page and pass
that onto the component.
I’ll also add in a pre tag to visually see the shape of the data.
<script lang="ts">
  import Reactions from '$lib/components/reactions.svelte'

  export let data: any
</script>

<pre>{JSON.stringify(data, null, 2)}</pre>

<h1>Welcome to SvelteKit</h1>
<p>
  Visit <a href="https://kit.svelte.dev">kit.svelte.dev</a> to read the
  documentation
</p>

<Reactions {data} />
Now I can pass the data prop to the component and use it to show the
count of the reaction along with another pre tag to show the shape
of the data.
<script lang="ts">
  import { reactions } from '$lib/config'

  export let data: any
</script>

<pre>{JSON.stringify(data, null, 2)}</pre>

<div class="flex justify-center">
  <form
    method="POST"
    action="/"
    class="grid grid-cols-2 gap-5 sm:flex"
  >
    {#each reactions as reaction}
      <button
        name="reaction"
        type="submit"
        value={reaction.type}
        class="btn btn-primary shadow-xl text-3xl font-bold"
      >
        <span>
          {reaction.emoji}
        </span>
      </button>
    {/each}
  </form>
</div>
Yes, I’m using an any type here, I’ll fix that later. For now I want
to see the data from the server.
The data for both the page and the component is showing an empty object at the moment because I haven’t loaded the data from the server yet.
In my src/routes/+page.server.ts file I’ll need to get the data from
Redis for each reaction type for the path of the page.
First up I’ll get my reaction types from the config file and pull out
the reaction.type then use that to map over and get the data from
Redis with a Promise.all and then return the data.
export const load = async ({ url: { pathname } }) => {
  const reaction_types = reactions.map(reaction => reaction.type)
  const promises = reaction_types.map(reaction =>
    redis.get(`${pathname}:${reaction}`),
  )
  const results = await Promise.all(promises)

  const count = {} as any
  reaction_types.forEach((reaction, index) => {
    count[reaction] = Number(results[index]) || 0
  })

  return { count }
}
Again! I’ll come onto the any type later.
Checking the index page I now get the reactions data loaded on both the page and in the component.
Clicking on a reaction button now increments the count and I can see
the result in the pre tag, I can remove these now.
Show the count
Now to show the count of each reaction type. I’ll add a span tag
inside the button and show the count there. I can pick the count out
of the data prop that’s being passed in for each reaction type.
<script lang="ts">
  import { reactions } from '$lib/config'

  export let path: string | null = '/'
  export let data: any
</script>

<div class="flex justify-center">
  <form
    method="POST"
    action="/?path={path}"
    class="grid grid-cols-2 gap-5 sm:flex"
  >
    {#each reactions as reaction}
      <button
        name="reaction"
        type="submit"
        value={reaction.type}
        class="btn btn-primary shadow-xl text-3xl font-bold"
      >
        <span>
          {reaction.emoji}
          {data?.count?.[reaction.type] || 0}
        </span>
      </button>
    {/each}
  </form>
</div>
I’ll sort out the any type now.
TypeScript types
I’ll address the any type now and add in some TypeScript types for
the data prop. So I need a way to represent the Redis data, it looks
something like this:
{
  "count": {
    "likes": 3,
    "hearts": 1,
    "poops": 0,
    "parties": 0
  }
}
Keys are strings and the values are numbers. So I’ll create a ReactionCount interface to represent the count.
I’ll also create a ReactionsData interface to represent the data
coming back from the server. This will have a path and a count which is the ReactionCount interface.
interface ReactionCount {
  [key: string]: number
}

interface ReactionsData {
  path: string
  count: ReactionCount
}
I’ll put these into the provided app.d.ts file that comes with the
SvelteKit skeleton template. The full src/app.d.ts file looks like
this:
// See https://kit.svelte.dev/docs/types#app
// for information about these interfaces
declare global {
  namespace App {
    // interface Error {}
    // interface Locals {}
    // interface PageData {}
    // interface Platform {}
  }

  interface ReactionCount {
    [key: string]: number
  }
  interface ReactionsData {
    path: string
    count: ReactionCount
  }
}

export {}
I’ll replace the any type for data in the component and on the
index page with the ReactionsData interface. Also in the load function on the +page.server.ts file.
Use enhance
Up till now each time I click a reaction button the page reloads and
the data is fetched from Redis. I’ll use the SvelteKit enhance function so there’s no page reload each time the buttons are clicked.
I’ll expand on the enhance function later when I rate limit the
reactions. Here’s the reactions.svelte component now, with the types
and enhance added:
<script lang="ts">
  import { enhance } from '$app/forms'
  import { reactions } from '$lib/config'

  export let path: string | null = '/'
  export let data: ReactionsData
</script>

<div class="flex justify-center">
  <form
    method="POST"
    action="/?path={path}"
    use:enhance
    class="grid grid-cols-2 gap-5 sm:flex"
  >
    {#each reactions as reaction}
      <button
        name="reaction"
        type="submit"
        value={reaction.type}
        class="btn btn-primary shadow-xl text-3xl font-bold"
      >
        <span>
          {reaction.emoji}
          {data?.count?.[reaction.type] || 0}
        </span>
      </button>
    {/each}
  </form>
</div>
Now I can spam the reaction buttons and the page doesn’t reload each time.
Rate limit the reactions
So, about that button spamming! I’ll add the rate limit to the src/routes/+page.server.ts file.
I’ll import Upstash ratelimit which will record the responses from the
current IP address temporarily (15 seconds) in Redis. To ge the IP
address I’ll use the getClientAddress function from SvelteKit.
If there’s more than 10 responses in that time I’ll apply the rate
limit and throw an error back to the client. I’ll import the SvelteKit fail function to do this.
import { reactions } from '$lib/config.js'
import { ratelimit, redis } from '$lib/redis.js'
import { fail } from '@sveltejs/kit'

export const actions = {
  default: async ({ request, url, getClientAddress }) => {
    const ip = getClientAddress()
    const rate_limit_attempt = await ratelimit.limit(ip)

    if (!rate_limit_attempt.success) {
      const time_remaining = Math.floor(
        (rate_limit_attempt.reset - new Date().getTime()) / 1000,
      )

      return fail(429, {
        error: `Rate limit exceeded. Try again in ${time_remaining} seconds`,
        time_remaining,
      })
    }

    const data = await request.formData()
    const reaction = data.get('reaction')
    const path = url.searchParams.get('path')

    const redisKey = `${path}:${reaction}`

    const result = await redis.incr(redisKey)

    return {
      success: true,
      status: 200,
      reaction: reaction,
      path: path,
      count: result,
    }
  },
}
Now spamming the button on the client I can add ten reactions and then the count stop incrementing. The only feedback I get that the rate limit has been applied is the error message in the network tab in the browser console.
I’ll customise the use:enhance function in the reactions.svelte component to get the ActionResult from the server. For now I’ll just
log the result to the console then choose not to reset the form.
use:enhance={() => {
  return ({ update, result }) => {
    console.log(JSON.stringify(result, null, 2))
    update({ reset: false })
  }
}}
Now if I spam a reaction button to go over the rate limit I get the following logged out to the browser console:
{
  "type": "failure",
  "status": 429,
  "data": {
    "error": "Rate limit exceeded. Try again in 7 seconds",
    "time_remaining": 7
  }
}
When I’m not being rate limited the output looks like this:
{
  "type": "success",
  "status": 200,
  "data": {
    "success": true,
    "status": 200,
    "reaction": "parties",
    "path": "/",
    "count": 274
  }
}
So I can use the type property to check if the response was a
success or failure. If it’s a failure I’ll disable the buttons for the
time remaining.
For the time_remaining that’s passed from Redis ratelimit to the
action I need a way to handle the result.
I’ll create a Svelte store for button_disabled and a handle_result function that will take in the result ("success" or "failure") and
set the store to true. After the timeout the store will be set back to
true.
let button_disabled = writable(false)

const handle_result = (result: ActionResult) => {
  if (result.type === 'failure') {
    $button_disabled = true
    setTimeout(
      () => {
        $button_disabled = false
      },
      result?.data?.time_remaining * 1000,
    )
  }
}
In the use:enhance function I’ll call the handle_result function,
then I can set the button disabled attribute to the store value.
Here’s the full reactions.svelte component now:
<script lang="ts">
  import { enhance } from '$app/forms'
  import { reactions } from '$lib/config'
  import type { ActionResult } from '@sveltejs/kit'
  import { writable } from 'svelte/store'

  export let path: string | null = '/'
  export let data: ReactionsData

  let button_disabled = writable(false)

  const handle_result = (result: ActionResult) => {
    if (result.type === 'failure') {
      $button_disabled = true
      setTimeout(() => {
        $button_disabled = false
      }, result?.data?.time_remaining * 1000)
    }
  }
</script>

<div class="flex justify-center">
  <form
    method="POST"
    action="/?path={path}"
    use:enhance={() => {
      return ({ update, result }) => {
        handle_result(result)
        console.log(JSON.stringify(result, null, 2))
        update({ reset: false })
      }
    }}
    class="grid grid-cols-2 gap-5 sm:flex"
  >
    {#each reactions as reaction}
      <button
        name="reaction"
        type="submit"
        value={reaction.type}
        class="btn btn-primary shadow-xl text-3xl font-bold"
        disabled={$button_disabled}
      >
        <span>
          {reaction.emoji}
          {data?.count?.[reaction.type] || 0}
        </span>
      </button>
    {/each}
  </form>
</div>
Now spamming the reactions buttons they get disabled and set back to enabled once the timeout has passed.
Use the component on a different page
Up until now the component has just been used on the index page. The intention when I started out doing this is to be able to use the component on any page.
I’ll create an about page and use the component in there, I’ll also
need a +page.server.ts file to go with the +page.svelte file, I’ll
create them now with a terminal command.
mkdir -p src/routes/about
touch src/routes/about/{+page.svelte,+page.server.ts}
In the src/routes/about/+page.svelte file I’ll import the component
and also the SvelteKit page store so I can get the current path.
<script lang="ts">
  import { page } from '$app/stores'
  import Reactions from '$lib/components/reactions.svelte'

  export let data: ReactionsData
  let path = $page.route.id
</script>

<Reactions {data} {path} />
In the src/routes/about/+page.server.ts file I’ll use the same load as what’s in the src/routes/index/+page.server.ts file.
export const load = async ({ url: { pathname } }) => {
  const reaction_types = reactions.map(reaction => reaction.type)

  const promises = reaction_types.map(reaction =>
    redis.get(`${pathname}:${reaction}`),
  )
  const results = await Promise.all(promises)

  const count = {} as any
  reaction_types.forEach((reaction, index) => {
    count[reaction] = Number(results[index]) || 0
  })

  return { count }
}
Now if I check my Redis database I can see that the reactions for the about page has been added.
Refactor page server load and reactions actions 😅
Two parts to this refactor, the first is to refactor the page server load function, the second is to refactor the reactions actions.
The src/routes/+page.server.ts load function is now duplicated
across the index page and the about page, it makes sense to refactor
this into a function that can be imported into the load function of
any +page.server.ts file you want to use it in.
Over in the src/lib/utils.ts file I’ll create a get_reaction_count function that will take in the pathname and return a ReactionCount object.
import { reactions } from './config'
import { redis } from './redis'

const reaction_types = reactions.map(reaction => reaction.type)

export async function get_reaction_count(
  pathname: string,
): Promise<ReactionCount> {
  const promises = reaction_types.map(reaction =>
    redis.get(`${pathname}:${reaction}`),
  )
  const results = await Promise.all(promises)

  const count = {} as ReactionCount
  reaction_types.forEach((reaction, index) => {
    count[reaction] = Number(results[index]) || 0
  })

  return count
}
Then in the +page.server.ts files I can import the function and use
it in the load function.
export const load = async ({ url: { pathname } }) => {
+  const count = await get_reaction_count(pathname)
-  const reaction_types = reactions.map(reaction => reaction.type)

-  const promises = reaction_types.map(reaction =>
-    redis.get(`${pathname}:${reaction}`),
-  )
-  const results = await Promise.all(promises)

-  const count = {} as any
-  reaction_types.forEach((reaction, index) => {
-    count[reaction] = Number(results[index]) || 0
-  })

  return { count }
}
The server action for adding the reactions to redis is currently on
the index page src/routes/index/+page.server.ts file.
I’ll move this into it’s own folder so it can be better identified.
The +page.server.ts file can go into it’s own folder, I’ll make the
folders for that to go into now:
# create the folder
mkdir -p src/routes/api/reactions
# copy the index +page.server.ts file into the new folder
cp src/routes/+page.server.ts src/routes/api/reactions/+page.server.ts
I’m not going to need the load function in this file so I’ll remove
it.
In the src/routes/+page.server.ts file I’ll remove the actions object so there’s just the load function importing the get_reaction_count from the src/lib/utils.ts file.
import { get_reaction_count } from '$lib/utils.js'

export const load = async ({ url: { pathname } }) => {
  const count = await get_reaction_count(pathname)
  return { count }
}
That’s it, any code duplication has been taken care of and I’ve abstracted out the server action into it’s own folder so it can be quickly identified.
Conclusion
I successfully created a reactions component with SvelteKit, powered by Upstash Redis for the data storage, and ensured its fair use with rate limiting.
I designed this component with the flexibility so it can be added on any page of a SvelteKit project, this should give an indication of user engagement for any project it’s used on.
This walkthrough, while thorough, only touches the surface of what can be achieved with SvelteKit and Redis. The most important takeaway for me is to keep exploring, experimenting and building - because that’s where the real learning happens!
Example
Ok, I’ve gone through the steps to create this component. If you just want to check out the example of the source code you can see the example repo on GitHub and the live demo.
Thanks
Thanks to Jamie Barton for giving me the idea for this component where he does something similar with Grafbase. There’s also the Upstash claps repo which is a Next.js example.
Thanks to Geoff Rich for his great posts on rate limiting with Redis and SvelteKit on the Upstash blog.
Also thanks to Kevin Åberg Kultalahti for feedback on the structure of the project.
There's a reactions leaderboard you can check out too.
Sign up for the newsletter
Want to keep up to date with what I'm working on?
Join other developers and sign up for the newsletter.
I care about the protection of your data. Read the Privacy Policy for more info.