Fathom Analytics with SvelteKit
In this guide I’ll go through the configuration needed to get set up with Fathom Analytics in a SvelteKit project.
I’ll cover getting set up, tracking goals and creating and using a custom Fathom Domain.
Fathom Analytics is a privacy focused product that I have loved using since 2019 now. I got tired of the confusing Google Analytics dashboard and wanted something simpler to use and to use a product that wasn’t going to sell off the browsing data of my sites visitors like Google does.
If you’re not already signed up you can get a $10 credit by signing up with my referral link. Yes I get a kick back from this, it’s an awesome product and if you’re interested in using it using the link would really help me out.
So, Fathom, digital privacy first. They’re GDPR, CCPA, ePrivacy, PECR compliant. Their business model is selling software, not data. Because of this, Fathom doesn’t require cookie banners.
Enough selling! Let’s get started!
Prerequisites
I’ll presume that you have a basic understanding of using a JavaScript framework like Svelte and are familiar with using the command line (CLI) to get certain tasks done.
So this means you already have a development environment with Node a terminal and a text editor like VS Code installed and ready to go. If you don’t then there are still services like Gitpod, StackBlitz and GitHub Codespaces you can use from a browser.
StackBlitz is bonkers fast and would be my go-to if I was to use one of the mentioned services there!
Create a Fathom site
Before I get into configuring the SvelteKit project I’ll need to
create a new site on Fathom. From my Fathom settings screen in the
sites section I can scroll down to the ‘Create New Site’ section and
enter a site name. I’m calling this one ideal-memory.
That link is a public Fathom dashboard you can go and check out now if you like.
ℹ️ The site name doesn’t have to correspond with the actual project name but it could get confusing if it doesn’t and you have a lot of sites.
Here’s what the create new site section looks like:

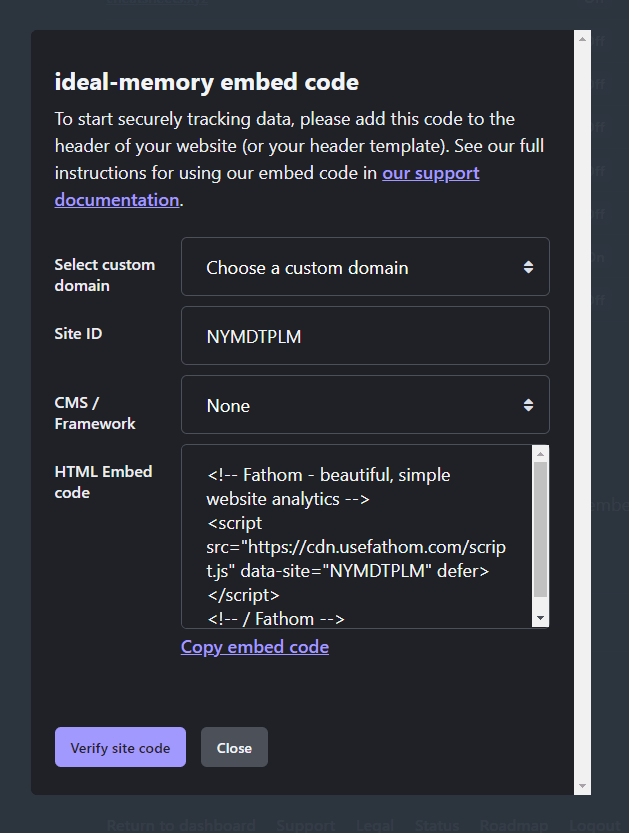
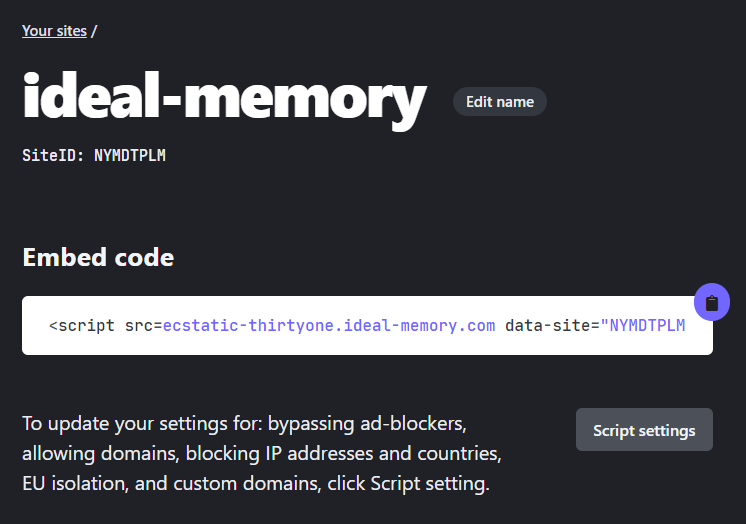
After clicking the ‘Create New Site’ button the embed dialogue will show with the Site ID, take a note of the site ID or copy the embed code:
That’s it for now on the Fathom side of things, I’ll leave this dialogue open and go back to this once I’ve set up the project.
Create the SvelteKit skeleton project
You can integrate Fathom with your current SvelteKit project but I’m going to do this with the SvelteKit skeleton project so you can get an idea of what’s going on here.
I’m going to create the project with the following command, I use pnpm but if you’re following along you can use your package manager
of choice (like npm or yarn):
pnpm create svelte sveltekit-and-fathomI’ll choose the following options from the CLI:
✔ Which Svelte app template? › Skeleton project
✔ Add type checking with TypeScript? › Yes, using TypeScript syntax
✔ Add ESLint for code linting? … Yes
✔ Add Prettier for code formatting? … Yes
✔ Add Playwright for browser testing? … Yes
✔ Add Vitest for unit testing? … Yes
I’ll change directory (cd) into the project and install the
dependencies:
cd sveltekit-and-fathom
pnpm i
Now I can check out the project in VS Code, the file structure looks like this:
sveltekit-and-fathom/
├── src
│   ├── routes
│   │   └── +page.svelte
│   ├── app.d.ts
│   ├── app.html
│   └── index.test.ts
├── static
│   └── favicon.png
├── tests
│   └── test.ts
├── .eslintignore
├── .eslintrc.cjs
├── .gitignore
├── .npmrc
├── .prettierignore
├── .prettierrc
├── README.md
├── package.json
├── playwright.config.ts
├── svelte.config.js
├── tsconfig.json
└── vite.config.ts
Add Fathom details to .env file
Create a .env file in the root of the project and add in the Fathom SiteID and the Fathom tracking script variables for Svelte to use,
this bash command will do the trick:
touch .env
echo PUBLIC_FATHOM_ID= >> .env
echo PUBLIC_FATHOM_URL= >> .env
Then add the SiteID and the tracking script to the variables to the .env file:
PUBLIC_FATHOM_ID=NYMDTPLM
PUBLIC_FATHOM_URL=https://cdn.usefathom.com/script.js
The reason for using a .env file if because a lot of ad blockers
will scrape it from places like GitHub, GitLab and Bitbucket and add
it to their block lists.
Install and config Fathom client
To start tracking page views I’ll first need to install fathom-client via pnpm as a dev dependency:
pnpm i -D fathom-clientTo start tracking page views the Fathom client will need to be in a place that wraps all the pages in the project.
I’ll use the +layout.svelte page for this, it will be applied to
every page in the project and can also be used to add styles and
components I want visible on each page.
Currently there’s only one page in the routes directory for the +page.svelte file. I’ll add in an about and a services routes
for some additional pages as well for now.
I’ll do this with a couple of bash commands in the terminal:
mkdir -p src/routes/{about,services}
touch src/routes/{+layout.svelte,about/+page.svelte,services/+page.svelte}
After running that I have a couple of new files in my src/routes directory:
sveltekit-and-fathom/
└── routes
    ├── about
    │   └── +page.svelte
    ├── services
    │   └── +page.svelte
    └── +layout.svelte
The about and services files are so I can check the route change
in my Fathom dashboard once I’ve configured the client, which I’ll do
now.
In the +layout.svelte file I’ll add this:
<script lang="ts">
	import { browser } from '$app/environment'
	import { page } from '$app/stores'
	import {
		PUBLIC_FATHOM_ID,
		PUBLIC_FATHOM_URL,
	} from '$env/static/public'
	import * as Fathom from 'fathom-client'
	import { onMount } from 'svelte'

	onMount(async () => {
		Fathom.load(PUBLIC_FATHOM_ID, {
			url: PUBLIC_FATHOM_URL,
		})
	})

	$: $page.url.pathname, browser && Fathom.trackPageview()
</script>

<ul>
	<a href="/">Home</a>
	<a href="/about">About</a>
	<a href="/services">Services</a>
</ul>

<slot />
Let’s break down what’s going on here, importing the browser indicates if the project is running in the browser or not, this will
return a Boolean (true, false) value. You can read more about $app-environment on the SvelteKit documentation.
Using page for the $page.url.pathname this is the route for the
current page that has been loaded. You can read more about $app/stores on the SvelteKit documentation. The $ is so that I
can subscribe to changes in that (page) store.
onMount is used to run after the +layout.svelte page has loaded,
that’s when I’m running the Fathom client and passing in my Fathom
site ID.
If you’re not familiar with Svelte the the $: might look a bit
funky, you can learn more about it on the Svelte
Reactivity/Declarations tutorial. The && is a short circuit
evaluation to if there’s no browser then Fathom.trackPageview() wont run.
ℹ️ As a side note here I will be using the Fathom SiteID and script
URL in an .env file so that it’s not visible when I commit the code
to GitHub.
If you’re using the environment variables you can replace the
hard-coded strings for the id and url with the variables, like
this:
onMount(async () => {
	Fathom.load(PUBLIC_FATHOM_ID, {
		url: PUBLIC_FATHOM_URL,
	})
})
Ok, with that explanation out of the way time to see if the client is working.
Validate the project is working on Fathom
As I noted earlier, a lot of ad blockers will have the Fathom tracking script added to their block lists. If you’re using and ad blocker and you want to validate it’s working then you will probably want to use a private browser window without the ad blocker enabled.
Don’t worry you can bypass all ad blockers by setting up a custom domain with Fathom, more on that later though! For now just use a private browser window to validate it’s working.
pnpm run devGoing over to my Fathom dashboard now I can check out that the
client is working as expected, here I’ve gone to the services page
and the page view is being tracked.

That’s it! I’ve now added Fathom tracking to my project.
Tracking goals (clicks)
Ok, now I want to see when someone has clicked a certain CTA or link.
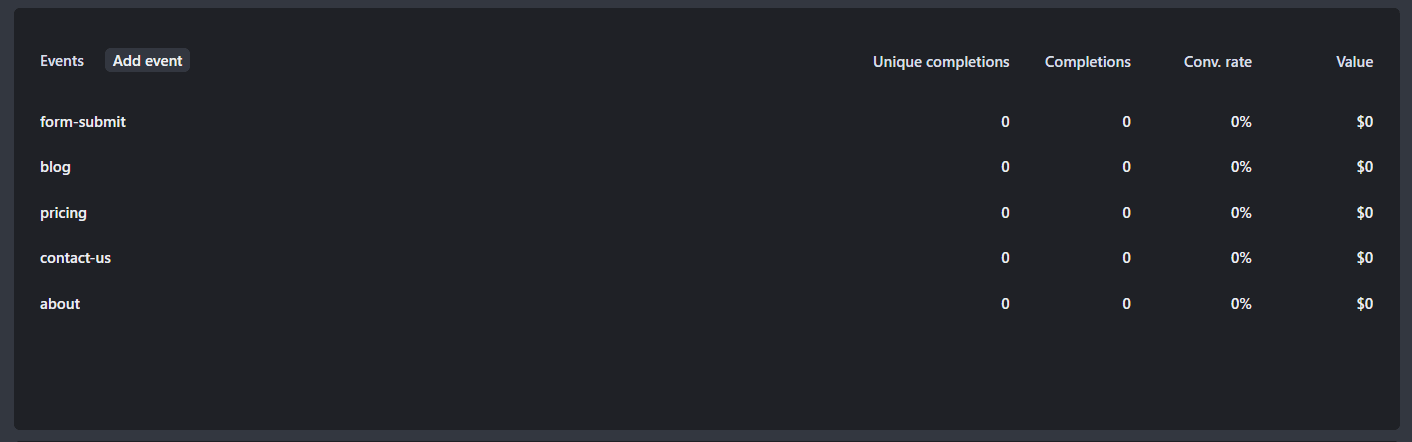
If I go to the Fathom dashboard for the site and scroll down to the bottom of the page I ca see the events section.
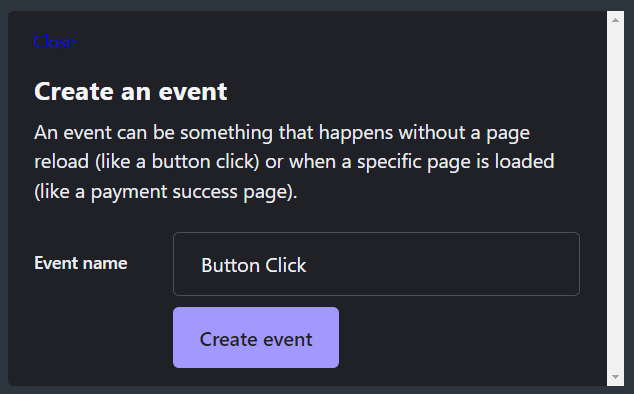
If I click on the Add event button there I’ll get a dialogue to
create a new event! I already have a few configured, I’ll add in one
for a generic Button Click. Then click the ‘Create event’ button.
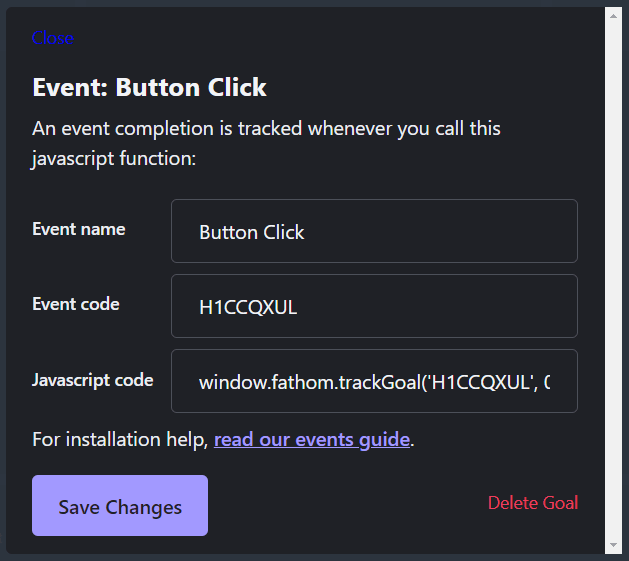
From here all I’ll really need to concern myself with is the ‘Event code’ I’ll take a note of that and use it a button on the index page.
So the site has no content right now! I know, I’ll just go and stick
this button in the src/routes/+page.svelte file for now.
<script lang="ts">
	import { trackGoal } from 'fathom-client'
</script>

<h1>Welcome to SvelteKit</h1>
<p>
	Visit <a href="https://kit.svelte.dev">kit.svelte.dev</a> to read the
	documentation
</p>

<button on:click={() => trackGoal(`H1CCQXUL`, 100)}>
	Don't Click This Button!!
</button>
So, what I’m doing here is importing the trackGoal function from fathom-client then using that in the on:click event handler for
the button.
Now going over to the index page of my SvelteKit project I can see the button click it then go back to the Fathom dashboard and see that the event has been recorded.
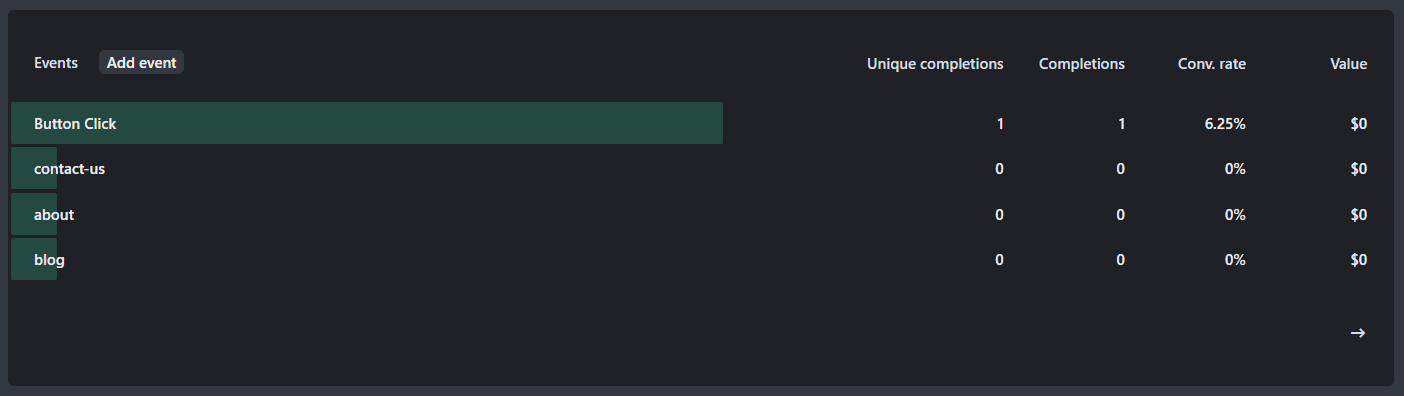
If the event has a monetary value you can also pass in the value per click.
<button on:click={() => trackGoal(`H1CCQXUL`, 100)}>
	Don't Click This Button!!
</button>
So in this case each click is worth $1.
I can also use it on links, here I’ve added the trackGoal to the
home page link.
<script lang="ts">
	import { browser } from '$app/environment'
	import { page } from '$app/stores'
	import {
		PUBLIC_FATHOM_ID,
		PUBLIC_FATHOM_URL,
	} from '$env/static/public'
	import * as Fathom from 'fathom-client'
	import { onMount } from 'svelte'

	onMount(async () => {
		Fathom.load(PUBLIC_FATHOM_ID, {
			url: PUBLIC_FATHOM_URL,
		})
	})

	$: $page.url.pathname, browser && Fathom.trackPageview()
</script>

<ul>
	<a href="/" on:click={() => Fathom.trackGoal(`KWOYX0PK`)}>Home</a>
	<a href="/about">About</a>
	<a href="/services">Services</a>
</ul>

<slot />
Using a custom domain
So last up I want to use a custom domain for my project!
Fathom use dynamic CNAME values which means that ad blockers can’t search for a specific domain to block.
To read more about this you can read the linked docs from Fathom on why they do this and a great run-down of how to set up a custom domain.
If I go back to the settings for the site (ideal-memory) I’ve been
configuring on Fathom there’s an option to add a domain!

Domain providers (much like styling) can be a personal choice, I use Namecheap, you can use whichever you please. I’ve been with Namecheap for many years with no issues from me. You experience may vary.
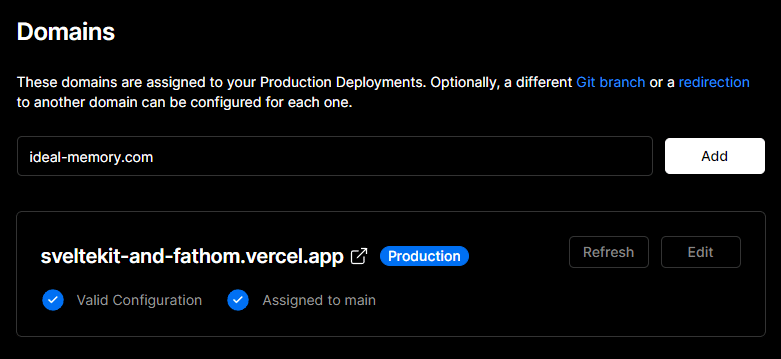
For this site I have gone and bought the ideal-memory.com domain.
I’ll be configuring this with Vercel. If you aren’t using vercel or
Namecheap some of the steps here may be different. The main concept
will be the same, which is add the provided CNAME value to your
domain.
I’ll add my domain and click the ‘Add domain’ button then in the dialogue which pops up after that I’ll need to take a note of the ‘CNAME’ and the value.
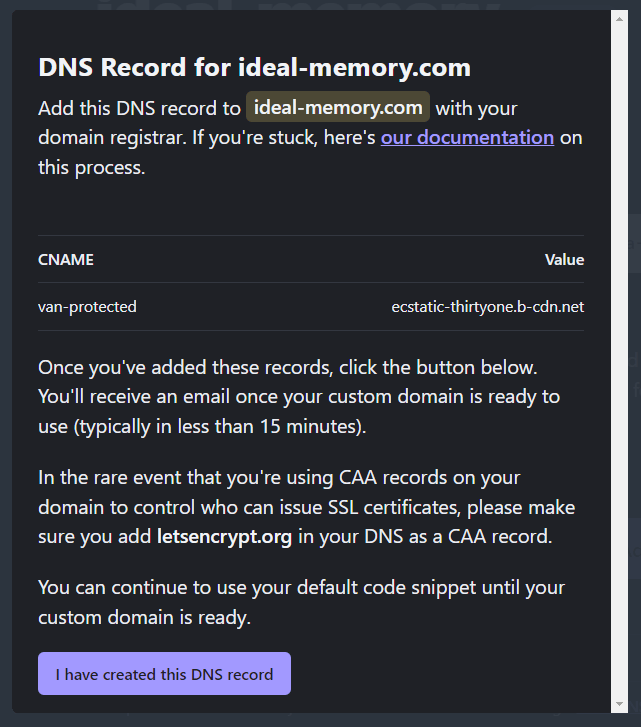
I’ll take a note of the values here for use later.
CNAME: van-protected
Value: ecstatic-thirtyone.b-cdn.net
So presuming my site is already deployed to Vercel (which it’s not right now), I push it to Vercel from the terminal with the Vercel CLI and a simple command from the root of my project:
vcThis guides me though deploying the project to Vercel. I’ve accepted the defaults (hit enter) for each prompt:
Vercel CLI 23.1.2
? Set up and deploy "~/repos/sveltekit-and-fathom"? [Y/n] y
? Which scope do you want to deploy to? Scott Spence
? Link to existing project? [y/N] n
? What's your project's name? sveltekit-and-fathom
? In which directory is your code located? ./
Auto-detected Project Settings (SvelteKit):
- Build Command: svelte-kit build
- Output Directory: public
- Development Command: svelte-kit dev --port $PORT
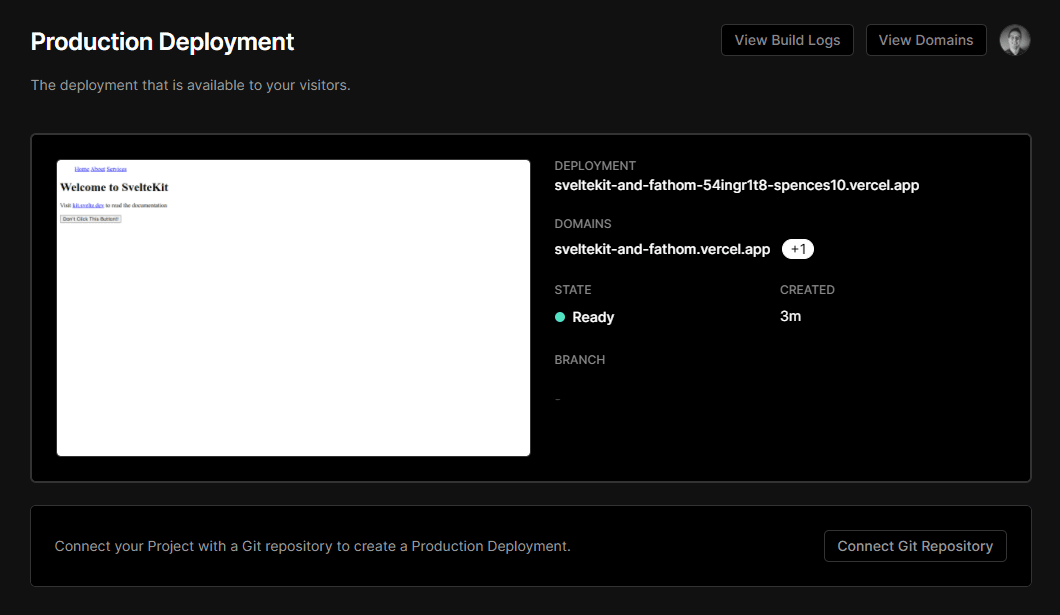
? Want to override the settings? [y/N] nWith that added to Vercel I can click on the Inspect link in the
console to go to my Vercel dashboard! As this project is on GitHub I
can also connect it from Vercel so that any changes that are made to
the project will be deployed automatically to Vercel on a git push!
I’ll click on the ‘Connect Git Repository’ button and link it to my GitHub project.
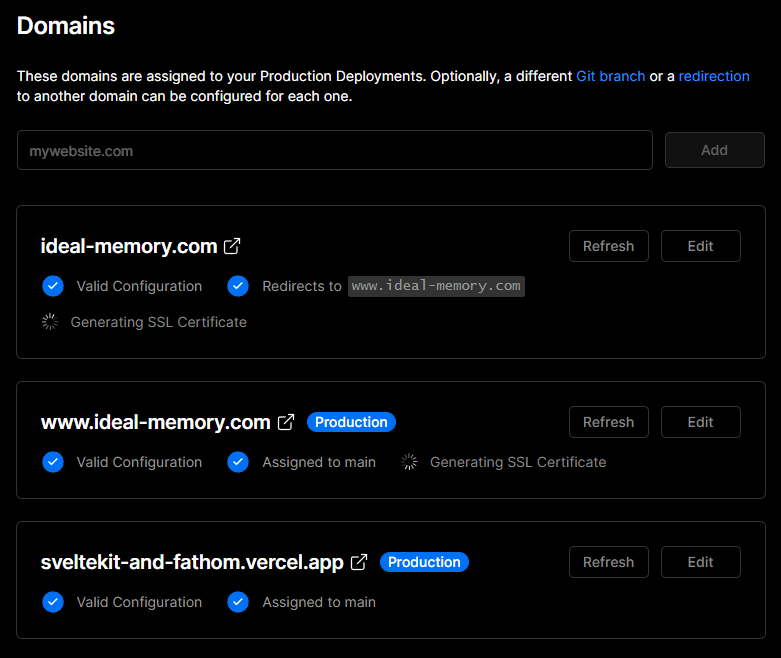
Now that’s connected I can go to the ‘Domains’ section and add in my domain.
What I’ll need to do now is add the Vercel nameservers to the domain on Namecheap!
I’ll get a confirmation on Vercel once the’re validated then I can access the project on the domain.
I’ll need to add the CNAME record to Vercel now, I can do that with the CLI.
vc dns add ideal-memory.com van-protected CNAME ecstatic-thirtyone.b-cdn.netGoing back to the Fathom dashboard I can now click on the ‘I have created the DNS record’ button, then it’s just a case of waiting for the record to be validated. This can take a while, with Namecheap it’s always been super fast.
Once it’s been validated I’ll get my new embed code
With the new domain I can replace the PUBLIC_FATHOM_URL in the .env file:
PUBLIC_FATHOM_ID=NYMDTPLM
-PUBLIC_FATHOM_URL=https://cdn.usefathom.com/script.js
+PUBLIC_FATHOM_URL=https://ecstatic-thirtyone.ideal-memory.com/script.js
One thing to note here is that I’ll need to add the .env variables
to the ‘Environment variables’ section of the project settings on
Vercel.
Rather than do a Git push I’ll just run the vc command again to push
up the latest changes with the new custom PUBLIC_FATHOM_URL.
Now if I use a browser with an ad blocker enabled and go to ideal-memory.com and select some routes and click the button I added
I can see the values on the Fathom dashboard get updated!
Wrap up
That’s it! I’ve now added Fathom to my SvelteKit project to track page changes and events. Set up a custom domain for it and it tracks details with an ad blocker enabled!
If you want to check out an example of this setup check out the GitHub repo!
There's a reactions leaderboard you can check out too.
Sign up for the newsletter
Want to keep up to date with what I'm working on?
Join other developers and sign up for the newsletter.
I care about the protection of your data. Read the Privacy Policy for more info.