SvelteKit Contact Form Example with Airtable
This is a how-to guide for adding a contact form to your SvelteKit site using Airtable to store the submissions and notify you when there is a new submission.
This is an update to the previous post I did on this, the recent changes to how you create access keys in the Airtable API means that I get a chance to revisit this and make it a little more current.
It will detail making a submission using an event handler and a default form action. Both of these examples will use built-in form validation on the client only.
After those examples I’ll go into setting up a similar example using SvelteKit Superforms which has client and server validation with Zod.
The previous post goes over creating a new SvelteKit project and setting up the Airtable base, for the sake of completeness I’ll go over that again here.
How forms are handled in SvelteKit
Because SvelteKit builds on top of the standard Web APIs there’s not a great deal of difference in how you handle forms in SvelteKit over standard HTML form submissions.
Collect data on the client ⇒ submit to the server ⇒ process the data ⇒ send a response back to the client.
Each of the examples in this post will be following this approach.
Create a new SvelteKit project
To create the example project I’ll scaffold out a new SvelteKit
project using the pnpm create command:
pnpm create svelte sveltekit-and-airtable-contact-form-exampleI’ll be picking the following options from the create-svelte CLI:
create-svelte version 4.1.0

┌  Welcome to SvelteKit!
│
◆  Which Svelte app template?
│  Skeleton project
│
◆  Add type checking with TypeScript?
│  Yes, using TypeScript syntax
│
◆  Select additional options (use arrow keys/space bar)
│  ◼ Add ESLint for code linting
│  ◼ Add Prettier for code formatting
│  ◼ Add Playwright for browser testing
│  ◼ Add Vitest for unit testing
└
Then I’ll need to create the routes for the examples, action, event-handler, and super-forms. I’ll create the folders and files
for these now along with the submit-form endpoint, I’ll do these via
bash, if you’re following along create the files how you like:
mkdir src/routes/{action,event-handler,submit-form,super-forms}With the folders created I’ll add in the files I need for each route:
touch src/routes/action/{+page.server.ts,+page.svelte}
touch src/routes/event-handler/+page.svelte
touch src/routes/submit-form/+server.ts
touch src/routes/super-forms/{+page.server.ts,+page.svelte}
Now I ‘ve got the files in place for the project I’ll focus on getting the Airtable base set up.
Create an Airtable base
If you’re new to Airtable you can sign up for a free account and go through the onboarding process which will ask you some questions to get set up with a new base.
I want a base that will store the submission from the contact form, I have an Airtable account already so I’ll create a new base from the dashboard.
Here’s what the base I created looks like. If you’re following along take note of the case of the table field names as they will need to match the code examples:
- base name:
contact-requests - table name:
submissions - table fields:
name,email,message - table field types:
single line text,email,long text
Create Airtable API key
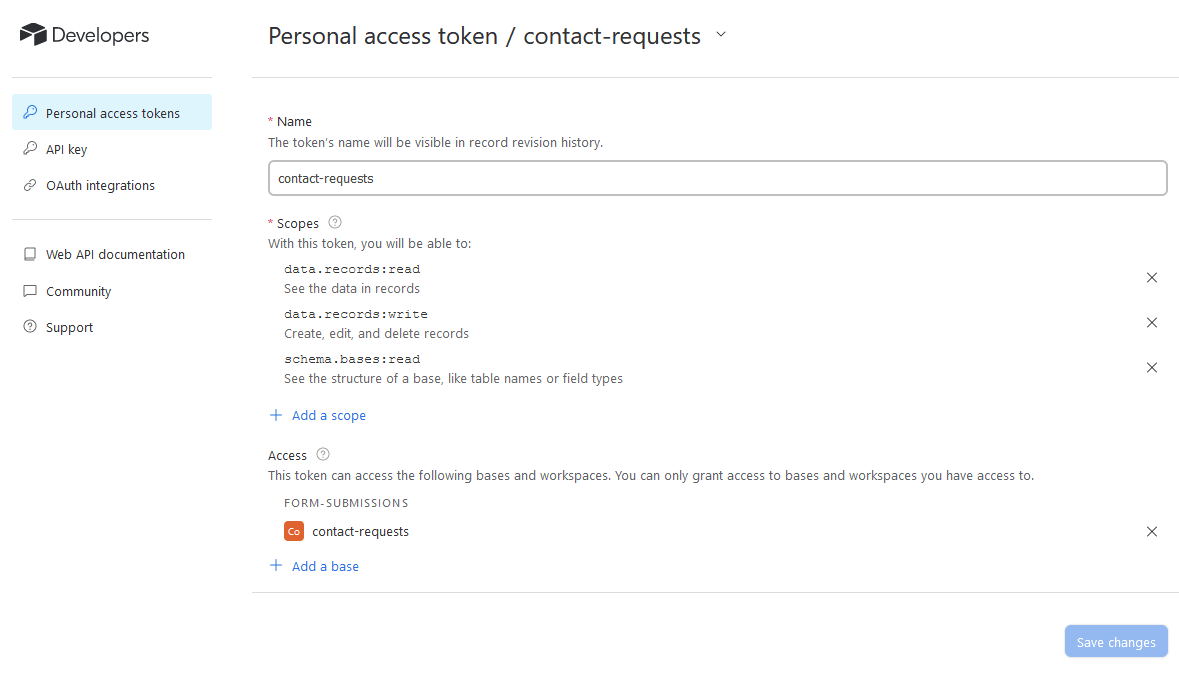
To be able to write data via the Airtable API I’ll create a Personal
access token with the following scopes and access to the contact-requests base:
Scopes
data.records:readSee the data in recordsdata.records:writeCreate, edit, and delete recordsschema.bases:readSee the structure of a base, like table names or field types
Access
contact-requests
I’ll click the ‘Create token’ button and copy the token value to the clipboard.
For reference, this is what I have for the scopes and access on Airtable:
I’ll need to save the generated token into a .env file. I can create
a new file for that with the following command:
touch .env
echo "AIRTABLE_API_KEY=" >> .env
echo "AIRTABLE_BASE_ID=" >> .env
I’ll add the generated AIRTABLE_API_KEY value to the .env file
there’s also the AIRTABLE_BASE_ID value that I’ll need to add to the .env file, I can get that from the Airtable API docs.
The Airtable base ID is detailed in the API docs for the project. The quickest way to get there is to click on the ‘Help’ link in the top right of the Airtable dashboard and then scroll down to the end of the panel that pops out and click on the ‘API documentation’ link under the ‘Additional resources’ section.
This opens up documentation specific to the base I’m working with. The ID for the base is detailed in the introduction section of the docs with the line:
The ID of this base is appXXXXXXXXXXXXXX.
I’ll copy the ID value and add it to the .env file for the AIRTABLE_BASE_ID.
The Airtable API docs also detail how I can ‘Create records’ using the API with curl and JavaScript examples. I’ll be using these to make the SvelteKit endpoint in the next section.
Create API endpoint
Aight, now I’ll scaffold out a SvelteKit POST endpoint to handle the
form submission. I’ve already got the +server.ts file I created
earlier in the src/routes/submit-form folder.
I’m going to base the code off of the Airtable curl example which
looks like this:
curl -X POST https://api.airtable.com/v0/appXXXXXXXXXXXXXX/submissions
  -H "Authorization: Bearer YOUR_SECRET_API_TOKEN"
  -H "Content-Type: application/json"
  --data '{
  "records": [
    {
      "fields": {
        "name": "Dave Davidson",
        "email": "[email protected]",
        "message": "Yo yo yo!"
      }
    }
  ]
}'
Really, all I need from this is the shape of the data being submitted which I’ll put into a variable like this:
let data = {
  records: [
    {
      fields: {
        name,
        email,
        message,
      },
    },
  ],
}
So in my endpoint I need to make a POST request to the Airtable API
using the fetch API. I’ll need to add the AIRTABLE_API_KEY and AIRTABLE_BASE_ID values from the .env file to the request headers
using the SvelteKit $env module and I’m going to want to return a
message if it fails or succeeds.
import {
  AIRTABLE_API_KEY,
  AIRTABLE_BASE_ID,
} from '$env/static/private'
import { json } from '@sveltejs/kit'

export const POST = async ({ request }) => {
  const { name, email, message } = await request.json()

  const AIRTABLE_URL = `https://api.airtable.com/v0/${AIRTABLE_BASE_ID}/submissions`

  let data = {
    records: [
      {
        fields: {
          name,
          email,
          message,
        },
      },
    ],
  }
  const res = await fetch(AIRTABLE_URL, {
    method: 'POST',
    headers: {
      Authorization: `Bearer ${AIRTABLE_API_KEY}`,
      'Content-Type': 'application/json',
    },
    body: JSON.stringify(data),
  })

  if (res.ok) {
    return json({
      message: 'success',
    })
  } else {
    return json({
      message: 'failed',
      status: 404,
    })
  }
}
Ok, now I’ve got the endpoint set up I can test it out. I’ll go with the event handler approach first.
With an event handler
In the previous post I did this, I used an event handler to handle the form submission. I’ll use the same approach here.
The input names will need to match the field names in the Airtable
base. I’ll add the name attribute to the input elements in the from
as well.
I’ll create a handle_submit function that will be called when the
form is submitted. I’ll use the preventDefault modifier to prevent
the default form submission behaviour and then I’ll get the form data
and pass that onto the submit-form endpoint via fetch request.
<script lang="ts">
  const handle_submit = async (event: Event) => {
    submission_status = 'submitting'

    const form = event.target as HTMLFormElement
    const form_data = new FormData(form)
    const data = Object.fromEntries(form_data)

    const res = await fetch('/submit-form', {
      method: 'POST',
      headers: {
        'Content-Type': 'application/json',
      },
      body: JSON.stringify(data),
    })

    const { message } = await res.json()
  }
</script>

<h2>Event handler</h2>

<form method="POST" on:submit|preventDefault={handle_submit}>
  <label for="name">
    <span>Name</span>
  </label>
  <input
    type="text"
    name="name"
    aria-label="name"
    placeholder="Enter your name"
    required
    autocomplete="off"
  />
  <label for="email">
    <span>Email</span>
  </label>
  <input
    type="email"
    name="email"
    aria-label="email"
    placeholder="[email protected]"
    required
    autocomplete="off"
  />
  <label for="message">
    <span>Message</span>
  </label>
  <textarea
    name="message"
    aria-label="message"
    placeholder="Message"
    required
    rows="3"
    autocomplete="off"
  />
  <input type="submit" value="Submit to Airtable" />
</form>
The message response form the endpoint can them be used for some conditional rendering of the form.
I’ll create a submission_status variable and set it to the response
form the endpoint. Then I can use some Svelte if blocks to render
different content depending on the status.
<script lang="ts">
  let submission_status = ''
  const handle_submit = async (event: Event) => {
    submission_status = 'submitting'

    const form = event.target as HTMLFormElement
    const form_data = new FormData(form)
    const data = Object.fromEntries(form_data)

    const res = await fetch('/submit-form', {
      method: 'POST',
      headers: {
        'Content-Type': 'application/json',
      },
      body: JSON.stringify(data),
    })

    const { message } = await res.json()
    submission_status = message
  }
</script>

<h2>Event handler</h2>

{#if submission_status === 'submitting'}
  <p>Submitting...</p>
{:else if submission_status === 'failed'}
  <p>Submission failed.</p>
{:else if submission_status === 'success'}
  <p>Submission success.</p>
{:else}
  <form method="POST" on:submit|preventDefault={handle_submit}>
    <label for="name">
      <span>Name</span>
    </label>
    <input
      type="text"
      name="name"
      aria-label="name"
      placeholder="Enter your name"
      required
      autocomplete="off"
    />
    <label for="email">
      <span>Email</span>
    </label>
    <input
      type="email"
      name="email"
      aria-label="email"
      placeholder="[email protected]"
      required
      autocomplete="off"
    />
    <label for="message">
      <span>Message</span>
    </label>
    <textarea
      name="message"
      aria-label="message"
      placeholder="Message"
      required
      rows="3"
      autocomplete="off"
    />
    <input type="submit" value="Submit to Airtable" />
  </form>
{/if}
Using the submission_status variable I can render different content
depending on the status of the submission.
With an action
Since the last post form ‘actions’ were implemented into SvelteKit.
Actions are a way to post data from a form to a server using the <form> element.
This means that JavaScript is not required to handle the form
submission in the browser and instead uses the default POST method.
The form can be submitted to the server from the client (browser).
In the +page.server.ts file I created for the action folder I’ll
add a default action to an actions object.
In it I’m destructuring request and fetch, I can use the request object to get the form data and then use fetch to send the data to
the submit-form endpoint.
export const actions = {
  default: async ({ request, fetch }) => {
    const formData = await request.formData()
    const data = Object.fromEntries(formData)
    const res = await fetch('/submit-form', {
      method: 'POST',
      headers: {
        'Content-Type': 'application/json',
      },
      body: JSON.stringify(data),
    })
    const responseJson = await res.json()
    return {
      body: responseJson,
    }
  },
}
In the +page.svelte file I’ll use the same markup for the name,
email and message fields as before.
In the form method, again I’ll use POST and that’s it. The form will
be submitted to the submit-form endpoint via the default action in
the +page.server.ts file.
<h2>Action</h2>

<form method="POST">
  <label for="name">
    <span>Name</span>
  </label>
  <input
    type="text"
    name="name"
    aria-label="name"
    placeholder="Enter your name"
    required
    autocomplete="off"
  />
  <label for="email">
    <span>Email</span>
  </label>
  <input
    type="email"
    name="email"
    aria-label="email"
    placeholder="[email protected]"
    required
    autocomplete="off"
  />
  <label for="message">
    <span>Message</span>
  </label>
  <textarea
    name="message"
    aria-label="name"
    placeholder="Message"
    required
    rows="3"
    autocomplete="off"
  />
  <input type="submit" value="Submit to Airtable" />
</form>
Ok… so, what about getting some information back from the server?
Much like the data prop that pages can use, they can also accept a form prop. You may have noticed the body: responseJson return in
the default action in the +page.server.ts file.
This is the response from the submit-form endpoint, it’s the same
response as the fetch call in the handle_submit function in the +page.svelte file. I can get the message from the response and use
it again in the page to do some conditional rendering.
So at the top of the +page.svelte file I’ll add a form prop to the
page component. As I’m using TypeScript I can add a type to the prop
as well.
<script lang="ts">
  import type { ActionData } from './$types'

  export let form: ActionData

  $: submission_status = form?.body?.message
</script>
This isn’t strictly necessary though as SvelteKit will infer the type, so I can just use this:
<script lang="ts">
  export let form

  $: submission_status = form?.body?.message
</script>
This is what the full +page.svelte file looks like:
<script lang="ts">
  import { enhance } from '$app/forms'

  export let form

  $: submission_status = form?.body?.message
</script>

<div>
  <h2>Action</h2>

  {#if submission_status === 'submitting'}
    <p>Submitting...</p>
  {:else if submission_status === 'failed'}
    <p>Submission failed.</p>
  {:else if submission_status === 'success'}
    <p>Submission success.</p>
  {:else}
    <form method="POST" use:enhance>
      <label for="name">
        <span>Name</span>
      </label>
      <input
        type="text"
        name="name"
        aria-label="name"
        placeholder="Enter your name"
        required
        autocomplete="off"
      />
      <label for="email">
        <span>Email</span>
      </label>
      <input
        type="email"
        name="email"
        aria-label="email"
        placeholder="[email protected]"
        required
        autocomplete="off"
      />
      <label for="message">
        <span>Message</span>
      </label>
      <textarea
        name="message"
        aria-label="message"
        placeholder="Message"
        required
        rows="3"
        autocomplete="off"
      />
      <input type="submit" value="Submit to Airtable" />
    </form>
  {/if}
</div>
You might also have noticed the use:enhance in the form element.
This is so the page doesn’t refresh when the form is submitted.
SvelteKit Superforms
A late addition to this post is the use of SvelteKit Superforms.
All of the validation in the prior examples was done using the built in HTML attributes for the form validation. This is fine for simple forms but it can get a bit messy when you have more complex forms.
Superforms is a package that allows you to create forms with validation via Zod on both the client and the server.
I’ll save a lot of the walkthrough for another post but I’ll show you how to use it with the form we’ve been working with.
So, I’ll need to install SvelteKit Superforms and Zod as dependencies.
pnpm i -D sveltekit-superforms zodThen in my super-forms folder where the +page.server.ts and +page.svelte files are I can define the validation schema (with Zod)
and the default form action.
The load function is going to return the form object wrapped in the superValidate function. This will validate the form data and return
the form object with the validation results.
import {
  AIRTABLE_BASE_ID,
  AIRTABLE_API_KEY,
} from '$env/static/private'
import { fail } from '@sveltejs/kit'
import { superValidate } from 'sveltekit-superforms/server'
import { z } from 'zod'

const new_contact = z.object({
  name: z.string(),
  email: z.string().email(),
  message: z.string(),
})

export const load = async event => {
  const form = await superValidate(event, new_contact)
  return {
    form,
  }
}

export const actions = {
  default: async event => {
    const form = await superValidate(event, new_contact)
    if (!form.valid) fail(400, { form })

    const { name, email, message } = form.data

    const AIRTABLE_URL = `https://api.airtable.com/v0/${AIRTABLE_BASE_ID}/submissions`

    let data = {
      records: [
        {
          fields: {
            name,
            email,
            message,
          },
        },
      ],
    }
    await fetch(AIRTABLE_URL, {
      method: 'POST',
      headers: {
        Authorization: `Bearer ${AIRTABLE_API_KEY}`,
        'Content-Type': 'application/json',
      },
      body: JSON.stringify(data),
    })

    return {
      form,
    }
  },
}
Now in the +page.svelte file I can import the superForm function
and destructure out the form, errors and enhance functions which
can also be used to validate the form on the client.
<script lang="ts">
  import { superForm } from 'sveltekit-superforms/client'
  import SuperDebug from 'sveltekit-superforms/client/SuperDebug.svelte'
  import { z } from 'zod'

  export let data

  let submission_status = ''

  const new_contact = z.object({
    name: z.string().min(2),
    email: z.string().email(),
    message: z.string().min(10),
  })

  const { form, errors, enhance } = superForm(data.form, {
    validators: new_contact,
    resetForm: true,
    onSubmit: event => {
      submission_status = 'submitting'
    },
    onUpdated: ({ form }) => {
      if (form.valid) {
        submission_status = 'success'
      }
      submission_status = ''
    },
    delayMs: 500,
  })
</script>

<div class="mx-auto max-w-xl">
  <h2>Super form</h2>

  {#if submission_status === 'submitting'}
    <p>Submitting...</p>
  {:else if submission_status === 'failed'}
    <p>Submission failed.</p>
  {:else if submission_status === 'success'}
    <p>Submission success.</p>
  {:else}
    <form method="POST" use:enhance>
      <label for="name" class="label">
        <span class="label-text">Name</span>
      </label>
      <input
        bind:value={$form.name}
        data-invalid={$errors.name}
        type="text"
        name="name"
        aria-label="name"
        placeholder="Enter your name"
        required
        autocomplete="off"
        class="input input-bordered w-full {$errors.name
          ? 'input-error'
          : ''}"
      />
      <label for="name" class="label">
        <span
          class="label-text-alt {$errors.name
            ? 'text-error'
            : 'text-base-100'}"
        >
          {$errors.name}
        </span>
      </label>

      <label for="email" class="label">
        <span class="label-text">Email</span>
      </label>
      <input
        bind:value={$form.email}
        type="email"
        name="email"
        aria-label="email"
        placeholder="[email protected]"
        required
        autocomplete="off"
        class="input input-bordered w-full {$errors.email
          ? 'input-error'
          : ''}"
      />
      <label for="email" class="label">
        <span
          class="label-text-alt {$errors.email
            ? 'text-error'
            : 'text-base-100'}"
        >
          {$errors.email}
        </span>
      </label>

      <label for="message" class="label">
        <span class="label-text">Message</span>
      </label>
      <textarea
        bind:value={$form.message}
        name="message"
        aria-label="message"
        placeholder="Message"
        required
        rows="3"
        autocomplete="off"
        class="textarea input-bordered w-full {$errors.message
          ? 'input-error'
          : ''}"
      />
      <label for="message" class="label">
        <span
          class="label-text-alt {$errors.message
            ? 'text-error'
            : 'text-base-100'}"
        >
          {$errors.message}
        </span>
      </label>

      <input
        type="submit"
        value="Submit to Airtable"
        class="btn btn-primary w-full mt-10"
      />
    </form>
  {/if}
</div>
You can see that I’m using a lot of conditional styling with Tailwind if there are errors or not. This is a really nice way to give the user some feedback on what they need to do to get the form to submit.
This is my initial attempt at using Superforms! There’s probably issues with this example and I’ll be taking some more time to fully go through the SvelteKit Superforms docs so I’m not missing out on any of the features it provides.
Airtable automation
Airtable can send you a notification email when there’s a new record added to the table (base) this means that you’re not having to check the table for new records.
To do that there’s an automations button in the top left of the Base, click that to open the automations panel.
Down on the bottom of the automations panel there’s a button to create a new automation, click that.
Then click on the + button to add a new trigger, select ‘When record
is created’, then a properties panel will open on the right.
For the configuration select the ‘submissions’ table, you can test the automation now by choosing a record from the table.
In the middle section of the automation panel you can click on ‘Add advanced logic or action’ and select ‘Send an email’ from the list.
Over in the properties panel on the right you can configure the email to send, you can add in the email you want the notifications sent to with a standard subject line.
In the message section of the properties panel you can choose what
data you want included in the email by clicking the + in the top
right of the input field.
I’ve picked the name, email and message fields to be included in the email. You can add in and additional message you want to be included.
Once all the fields are configured you can click the ‘Generate a preview’ button at the bottom of the page to see what the email will look like.
If you’re happy with the automation and want to use it don’t forget to toggle it on in the top left of the center panel.
Conclusion
I went through the process of creating a contact form with SvelteKit and used Airtable to store the form submissions.
I created an endpoint to submit the data to Airtable on the server then demonstrated how to submit the data with an event handler, a SvelteKit form action and with Superforms.
I hope you can take this information and start implementing your own contact forms on your projects.
If you’re interested, you can check out the example code for this post over on GitHub sveltekit-and-airtable-contact-form-example.
Thanks!
There's a reactions leaderboard you can check out too.
Sign up for the newsletter
Want to keep up to date with what I'm working on?
Join other developers and sign up for the newsletter.
I care about the protection of your data. Read the Privacy Policy for more info.